| Home | “For about US$220 worth of parts, this project enables the bedridden to very easily use a computer in bed.” |
My Invention: Monitor Arm for the Bedridden
By Howard Charles Best, May 5, 2005
(LLBest.com)
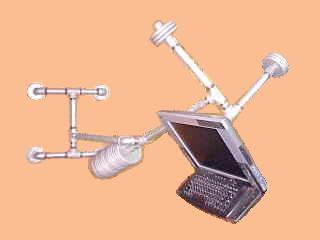
The monitor arm for the bedridden uses standard pipe
fittings and standard barbell/dumbbell weights.
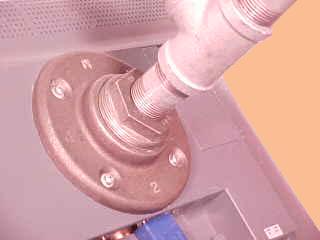
Close-up showing how a 2" floor flange is attached to the
back of the LCD monitor using 4mm machine screws.
For about US$220 worth of parts, this “monitor arm” enables the bedridden to very easily use a computer in bed. This project is also useful for providing added comfort for the prolonged use of a computer by “normal” people. It uses standard 1 inch and ¾ inch pipe fittings and standard 5 pound and 2½ pound barbell/dumbbell weights.
This invention even allows a person who is lying flat on his/her back on an ordinary bed to easily use a mouse and keyboard, and to easily see the monitor! However, in order to take full advantage of this invention, a bed which has a head which raises, such as an electric hospital bed, is highly recommended.
Hints
1. This project is only practical with an LCD monitor which has four equally spaced (forming a square), centrally located machine screw holes on the back of it. I used a 17 inch LCD monitor that I got at Walmart™ two or three years ago when it was on sale for about US$350.
2. Make sure that the monitor arm is screwed into two adjacent studs, otherwise it may fall, taking part of the wall with it!3. Although the finished product requires only 21 pipes/nipples, in order to save on the number of trips to the hardware store, I recommend that you buy at least 50 assorted lengths, and then “return for a refund” what you haven’t used, after the job is completed.
4. Use galvanized pipes/fittings.
5. No tools except a screwdriver and a strap wrench are required to put the assembly together, but getting it apart again in order to make changes is another matter. Use two strap wrenches so as not to damage the parts, so that you can return them for a refund. If the strap wrenches don’t do the job, then you’ll have to resort to a pipe wrench and a large strap wrench or perhaps even two pipe wrenches. Pipe pliers are not recommended as they tend to slip, damaging the surface of the pipe fittings, thus making it difficult or impossible to return them for a refund.
6. When attaching the 2" floor flange to the back of the LCD monitor using the 4mm x ¾" machine screws, first slide a lock washer, then a flat washer, and then a finishing washer (upside down) onto each of the screws.
7. All of the fittings have to be moderately tight, even the ones that have to move. If the ones that are supposed to move are not moderately tight, then the balancing will be too critical to be practical.
8. One fitting, the first 18" pipe, must be extremely tight on both ends. One end screws into a Tee on the wall mounting assembly. The other end, the end which extends out into the room, screws into a 90° elbow. In order to get enough torque, I used a 1" coupler (to be returned later for a refund) to join the other 18" pipe to the 10" nipple. Then I screwed it into the other end of the elbow for use as a temporary lever.
9. Be very careful, when adding or subtracting weights, that the assembly doesn’t tip, thus causing the weights to fall, possibly causing injury and/or damage.
10. Balancing is done by a combination of the size/number of weights and the length of the 1" pipe that the weight assemblies are attached to.
11. Make sure that if the keyboard shelf/keyboard falls off of the monitor (they are held on using Velcro), the assembly doesn’t smash the weights into your computer and the monitor into the ceiling! I’ve made sure that this won’t happen by making the particular “Tee” fitting tight, and by setting things up in such a way that the falling weights make the fitting more tight, and not more loose (see photo above). Also, I’ve balanced the monitor in such a way that the balance is a compromise between having the keyboard attached and not having it attached. Therefore, removing the keyboard assembly from the monitor does not result in the monitor moving at all.
12. Although the lightweight wireless keyboard which I’ve chosen for this project (Silitek SK-7551) has a built-in PHDR0 port pointing device, I’ve found that it’s much easier to use a standard two-button USB mouse using a “stomach supported” 3-ring binder as a mouse pad. Under Windows XP™, both pointing devices are fully functional at all times, so I can use the keyboard’s pointing device if I don’t want to bother grabbing the mouse and the 3-ring binder. Although I haven’t tried it, a clipboard should also suffice as a mouse pad.
13. “Trial and error” (mostly error) is the name of the game, so a great deal of patience is required, but the result is well worth the effort!
Monitor Arm Parts List
Shown are the sizes and quantities which I used and the prices that I paid at a couple of local small-town hardware stores (Ace™ and True Value™). The barbell/dumbbell weights were purchased from Walmart. You will have to vary this parts list to suit your own particular situation.
1. (4) 1" x 1½" (close) nipples (for connecting the 4 wall mounted floor flanges to 4 elbows—$1.59 each)
2. (3) 1" x 2" nipples (to serve as pivots at the bases of two of the Tees and for connecting to one of the weight assemblies—$1.89 each)
3. (2) 1" x 2½" nipples (for connecting a Tee fitting to the 2" floor flange on the back of the LCD monitor and for connecting the bottom Tee to the middle Tee of the wall assembly—$1.99 each)
4. (2) 1" x 5½" nipples (for connecting 2 of the elbows to 2 Tees of the wall mounting assembly—$2.69 each)
5. (2) 1" x 6" nipples (for connecting the other 2 elbows to the 2 Tees of the wall mounting assembly—$2.99 each)
NOTE: The 5" and 6" lengths of the above listed nipples result in the wall mounting assembly spanning 16" (the distance between 2 normally spaced wall studs). If you want the outside floor flange screw holes to be 16" apart, then the lengths should be changed to 4½ and 5". If you want 16" between the inside holes, then the lengths should be changed to 6½" and 7".
6. (1) 1" x 7" nipple (for connecting to one of the weight assemblies—$5.19)
7. (1) 1" x 8" nipple (for connecting the top Tee to the middle Tee of the wall assembly—$4.09)
8. (1) 1" x 10" nipple (for connecting to one of the weight assemblies—$4.59)
9. (2) 1" x 18" pipes (for connecting the wall mount assembly to an elbow/Tee assembly and for connecting the elbow/Tee assembly to the monitor assembly—$3.99 each)
10. (2) ¾" x 2½" nipples (for supporting (3 x 2) 2½# counterbalancing weights—$1.49 each)
11. (1) ¾" x 12" nipple (for supporting (16) 5# counterbalancing weights (See table below)—$5.99)
12. (3) 1" to ¾" reducing couplings ($3.59 each)
13. (3) ¾" caps ($2.09 each)
14. (6) 1" Tee fittings ($4.29 each)
15. (5) 1" 90° elbows ($2.99 each)
16. (1) 2" floor flange (for connecting to back of LCD monitor—$7.99)
17. (4) 1" floor flanges (for fastening to wall—$5.19 each)
18. (1) 2" to 1" hex bushing (for connecting to back of LCD monitor—$3.99)
19. (4) 4mm x ¾" machine screws (for connecting to back of LCD monitor—$.20 each)
20. (4) 4mm or #6 lock washers (for connecting to back of LCD monitor—$.04 each)
21. (4) 4mm or #6 flat washers (for connecting to back of LCD monitor—$.04 each)
22. (4) 4mm or #6 finishing washers (for connecting to back of LCD monitor—use upside-down—$.04 each)
23. (16) #12 flat head wood screws (If you are screwing into a wood panel wall, then all 16 screws can be 1" long ($.08 each), but first use at least (4) 2½" brass colored screws to fasten the wood paneling to the studs right underneath where the floor flanges are to go. If you are mounting on a plasterboard wall, then use (8) 2 1/4" screws to go into the studs, and (8) matching 1" long screws going into large size plastic anchors.)
24. (6) 2½#, 5" diameter, ½" thick barbell/dumbbell weights ($1.38 each)
25. (16) 5#, 6½" diameter, 5/8" thick barbell/dumbbell weights (See table below—$2.78 each)
26. (3) 1" (hole diameter) x 5/32" thick washers to take up the extra space after the last of the 5# weights was added (See table below—$.54 each)
| 5# weights¹, 1" washers² | ¾" nipple length³ | Nipple prices |
| 1, 1 | 1½" | $1.09 |
| 2, 0 | 2" | $1.09 |
| 3, 2 | 3" | $1.29 |
| 4, 0 | 3½" | $1.49 |
| 5, 0 | 4" | $1.59 |
| 6, 1 | 5" | $2.09 |
| 7, 0 | 5½" | $1.99 |
| 8, 0 | 6" | $2.49 |
| 9, 2 | 7" | $3.19 |
| 10, 3 | 8" | $3.49 |
| 11, 0 | 8" | $3.49 |
| 12, 1 | 9" | $4.59 |
| 13, 2 | 10" | $4.99 |
| 16, 3 | 12" | $5.99 |
| 17, 0 | 12" | $5.99 |
¹ Weights are 5#, 6½" diameter, 5/8" thick barbell/dumbbell weights purchased from the Walmart sporting goods department.
² Washers are 1" (hole diameter) x 5/32" thick, purchased from a local True Value hardware store.
³ The lengths shown in the table for the ¾" nipples include enough extra length to screw into a 1" to ¾" reducing coupling and into a ¾" cap.
Keyboard Shelf Parts List
1. (2) 6" corner braces ($2.39 each)
2. (6) #10 x 24 “T” nuts ($.30 each)
3. (6) #10 x 24 x 3/8" flat head machine screws (could only find in brass—$.18 each)
4. (1) 6" x 18" x 3/16" hardboard (I got mine for free)
5. (1) can of flat black spray paint ($.94 at Walmart)
6. (1) box of 2" x 5' black, “industrial strength” self-adhesive Velcro™ ($5.98 at Walmart)
7. (1) Silitek SK-7551 wireless keyboard with built-in pointing device (Works for months on 2 AA batteries—as low as $23.50 plus shipping: http://www.iwin2win.com/silskwirkeyi.html, http://www.pctekonline.com/skcomwirkeyw.html or http://www.computernyc.com/ifkey59.html)
The keyboard is attached to the shelf using self-adhesive Velcro so that it is removable. The corner braces are attached to the monitor using Velcro for the same reason, and also so that no permanent modifications have to be made to the LCD monitor.
| Home | THIS WEB PAGE URL: http://LLBest.com/?P=1m |